如何有效率地管理 React 局部狀態? 這次我選擇了 Zustand!
前情提要:
目前公司前端的 code base 使用 React,並採用Redux來管理應用程式層級的全局狀態,而各個頁面的 component 則單純使用 props 來傳遞資料��。最近公司要改寫產品的其中一個頁面,並且提供新的功能。由於我們的前端 code base 一直以來都缺乏維護,其中包含一些難以閱讀且難以刪除的 legacy code,這次我們正好有機會局部重寫並重新規劃前端的資料傳遞邏輯架構。
一直以來我們的 component 都是用 props 來傳遞資料,有一些功能比較複雜的頁面元件,component tree 的深度可能達到十幾層,這使得這類型的複雜元件的 props drilling 問題非常嚴重,不僅非常難以追蹤程式碼,也有嚴重的 re-render 問題。因此,當我接到這個任務時,我研究了一下我們目前的需求以及 React 生態系中的狀態管理工具,最終我選擇使用Zustand來管理這個頁面的局部狀態。
為何選擇使用 Zustand ?
需求: Component 層級的狀態管理
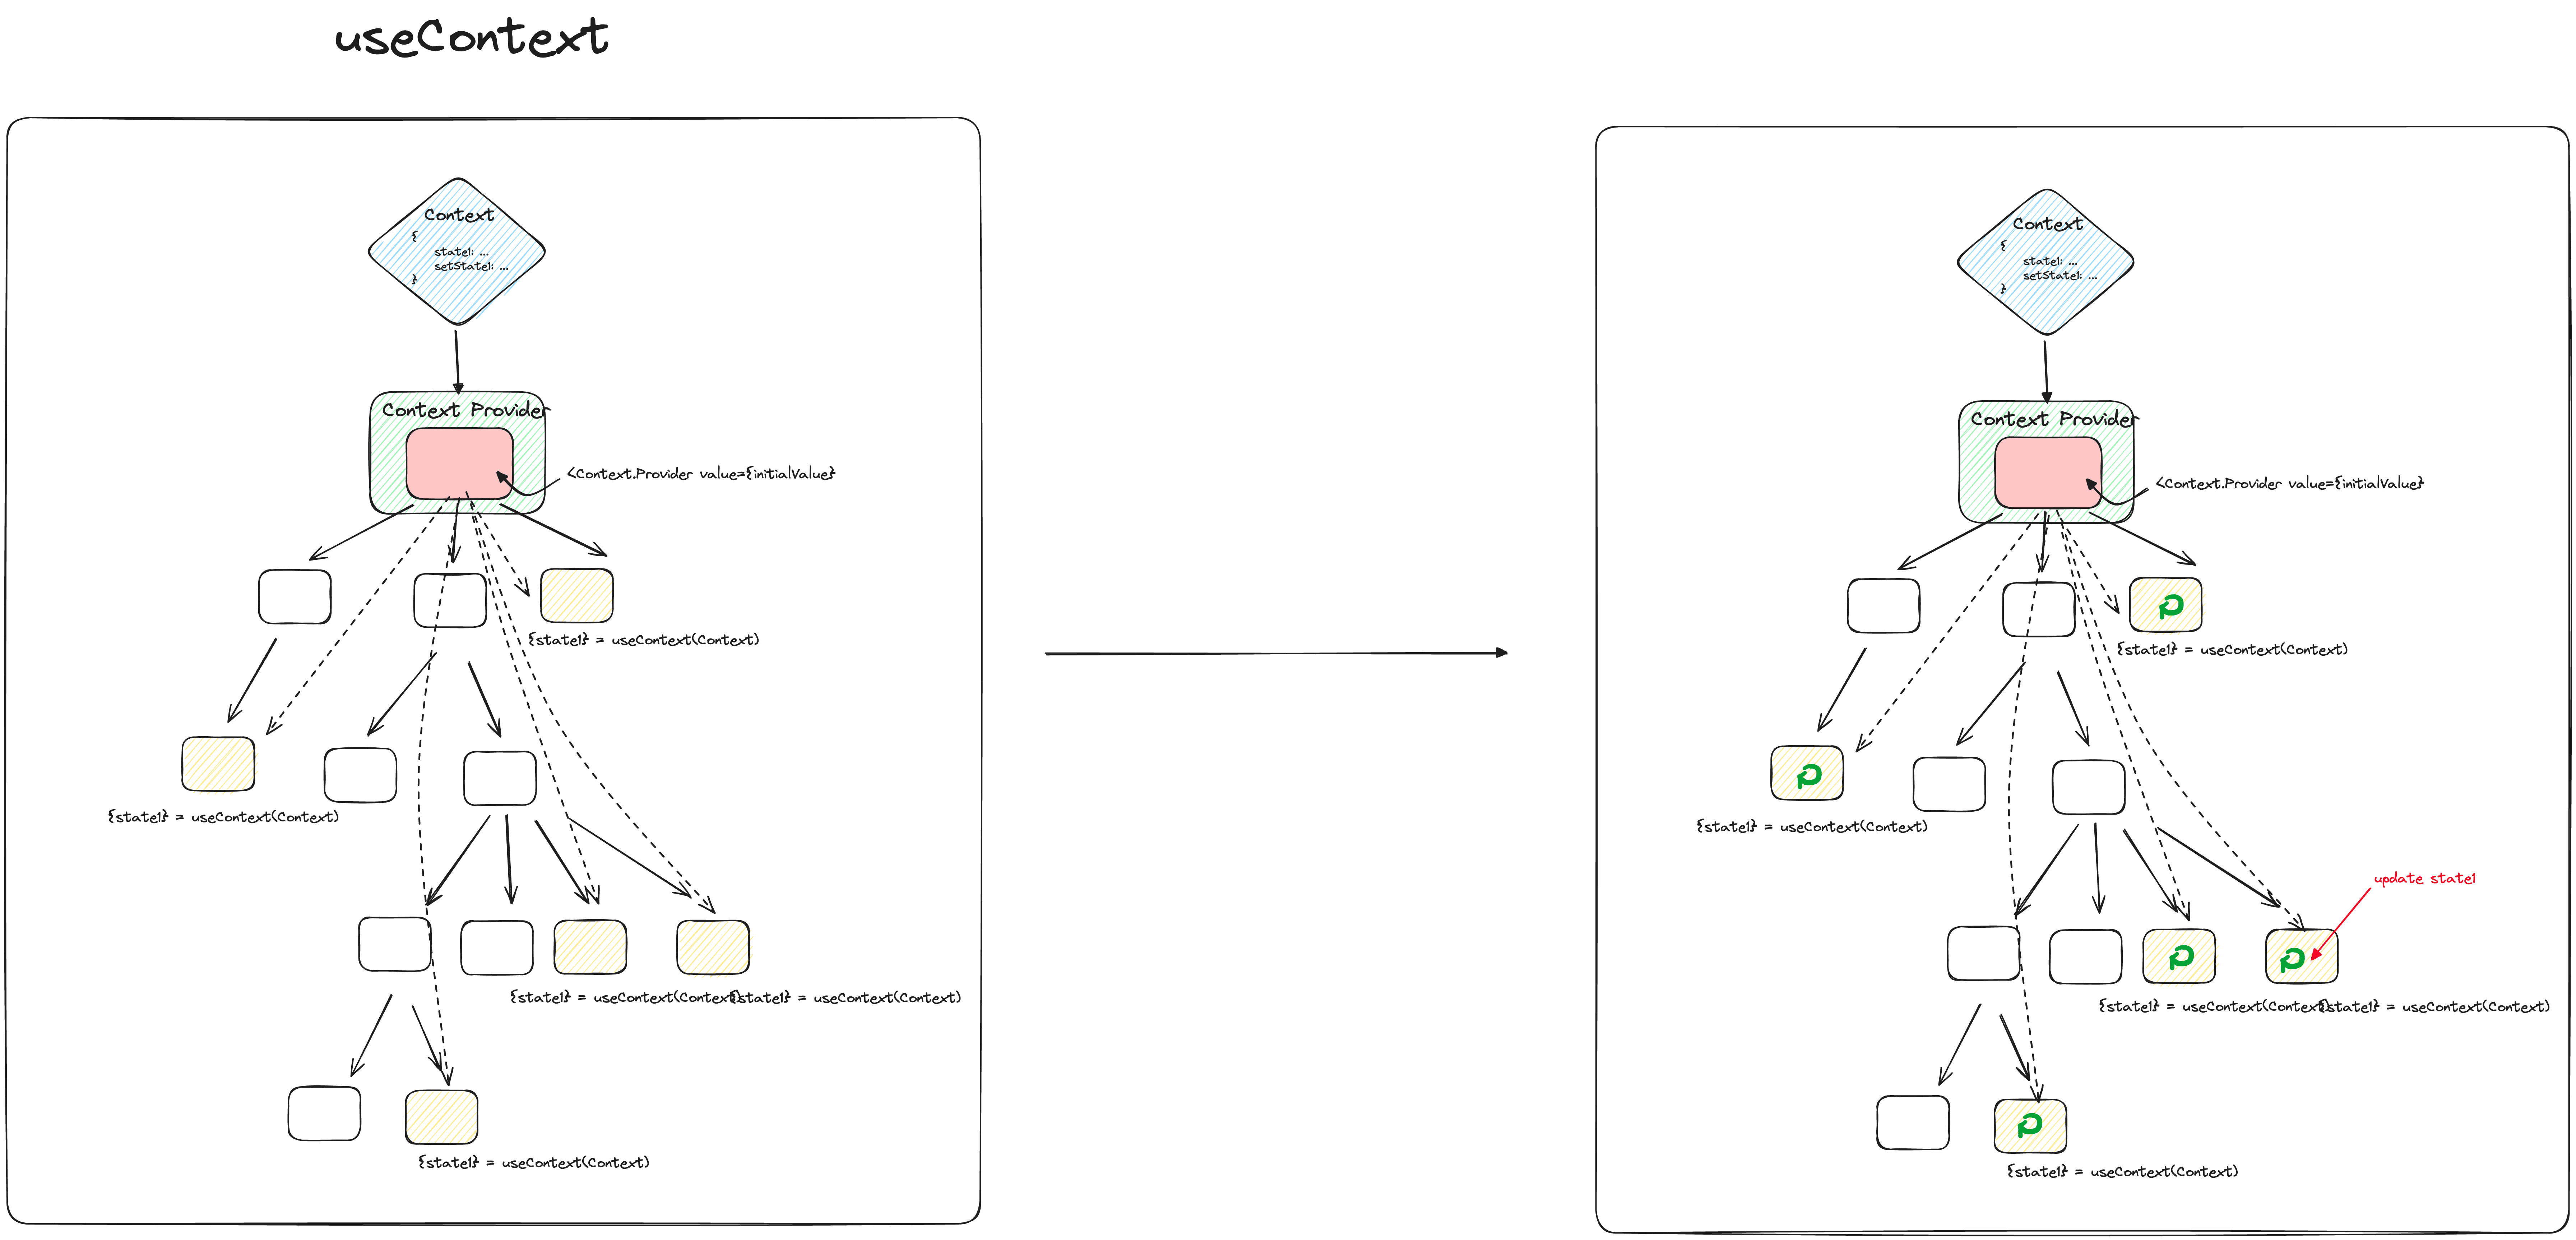
過去我習慣用 React 原生的 useContext hook 集中管理大component 的 state,來讓比較深層的 children components 直接呼叫 hook 來取得需要的 state。useContext 的好處就是非常簡單易學易用,同時又能解決 props drilling 的問題,但是 useContext 最令人可惜的點就在於,當任何一個 context 內的 state 被更新,所有使用到 useContext 的 components 都會被重新渲染,依然沒辦法有效避免 re-render 的問題。
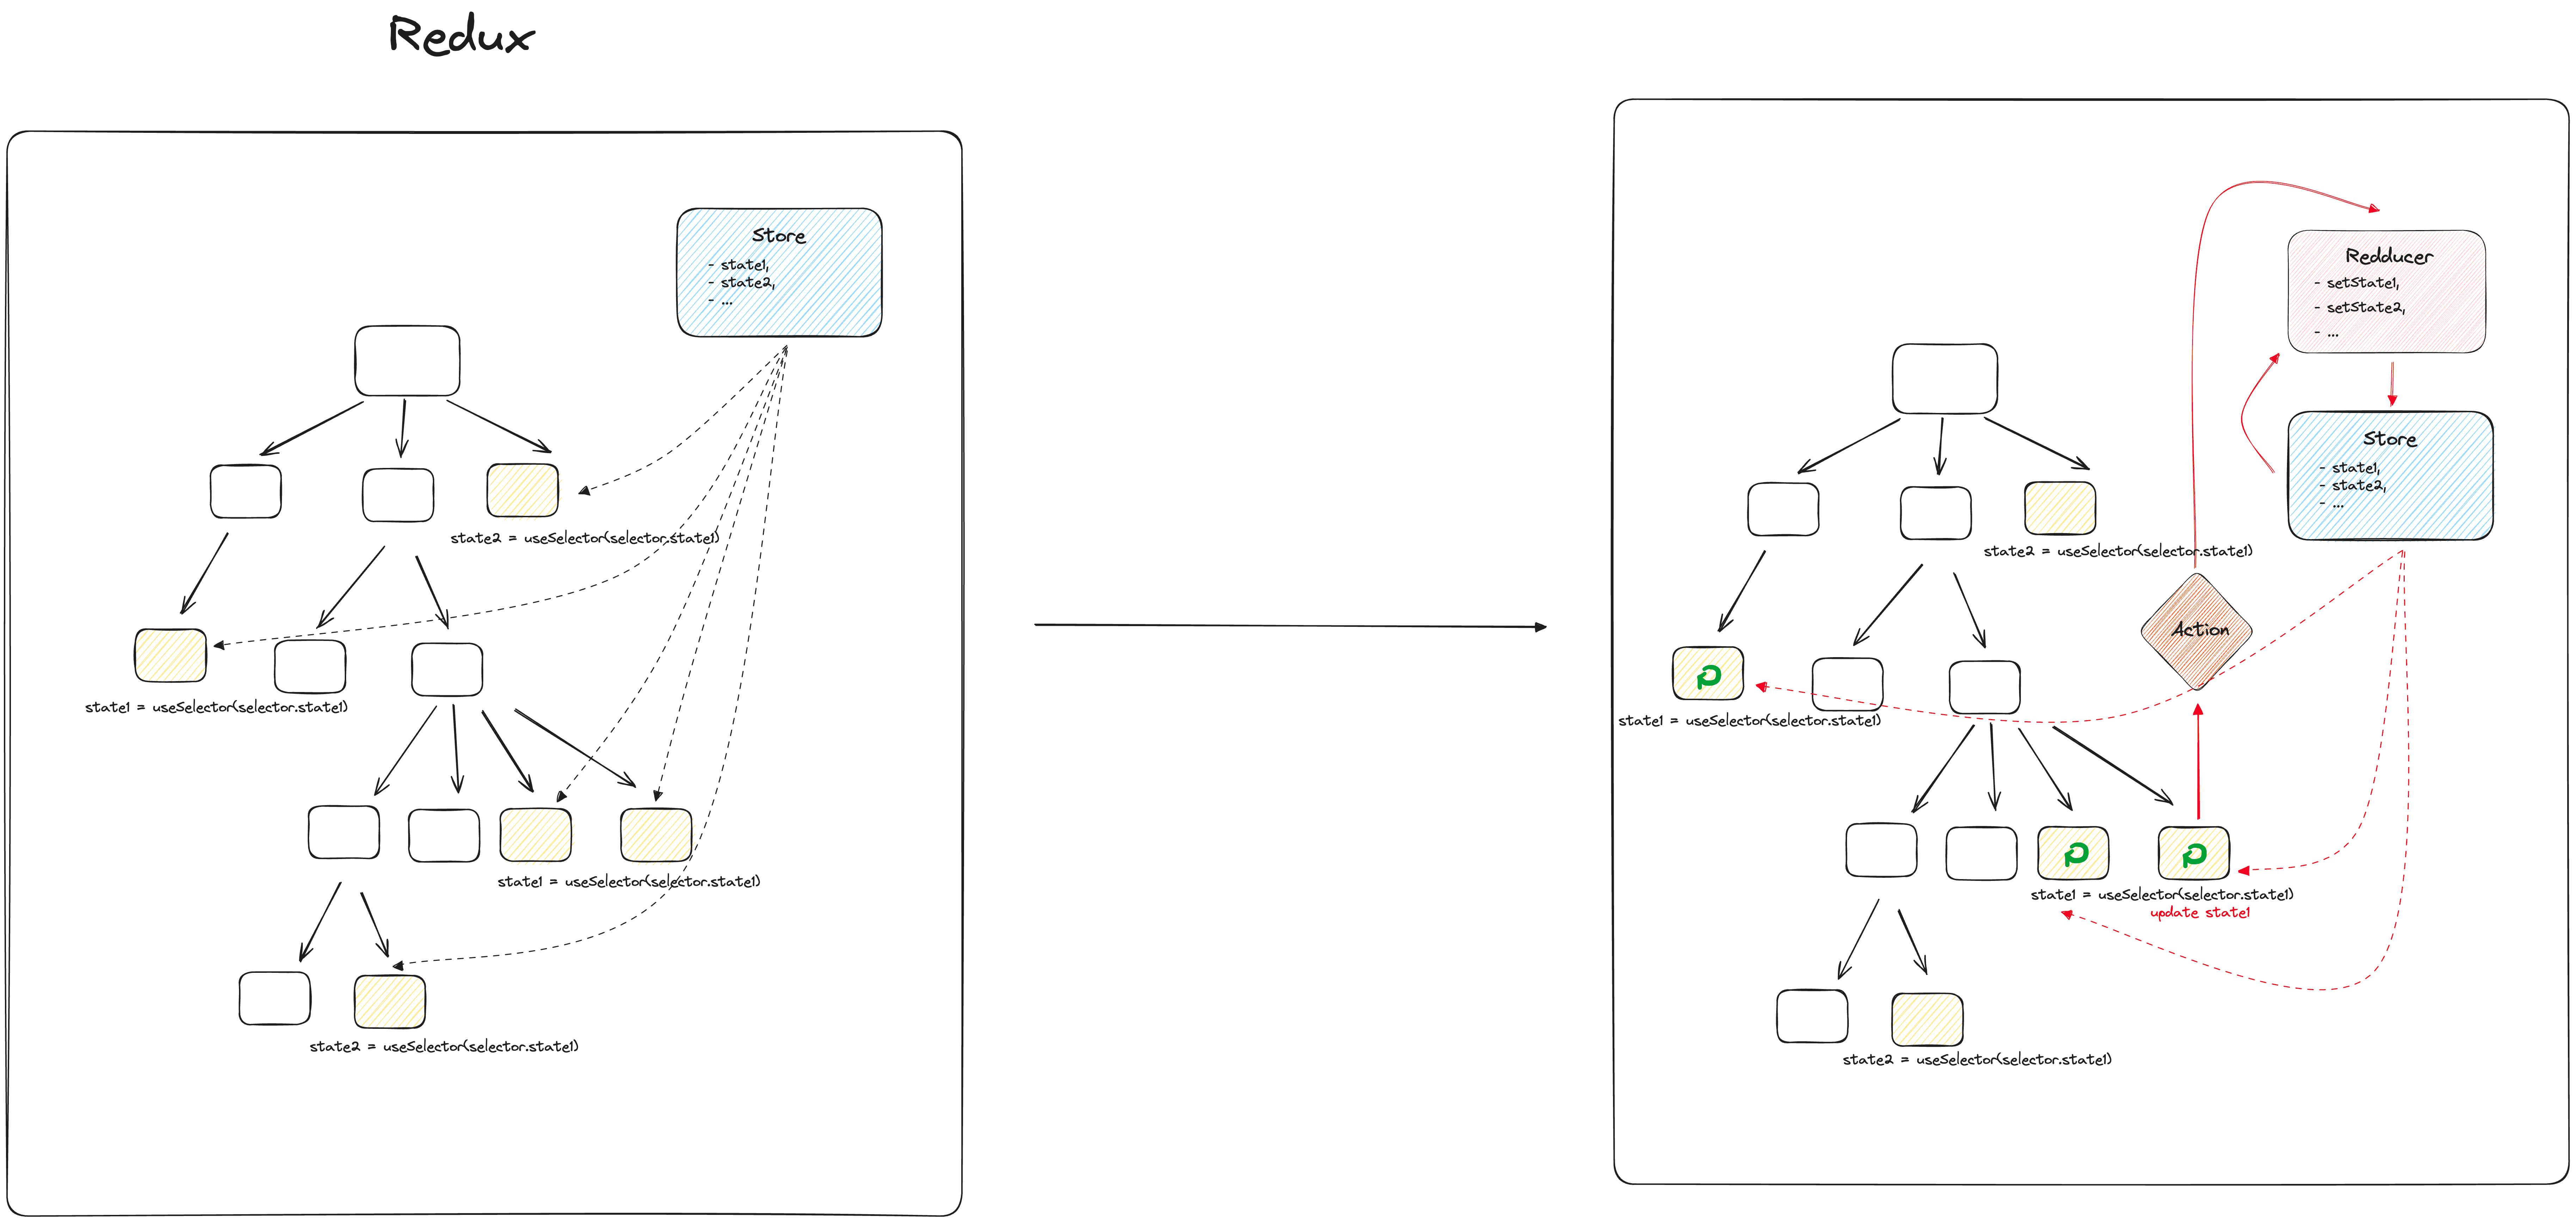
前面提到,目前我們使用 Redux 來管理全局狀態,我們主要拿 redux 來管理像是 User 資訊、各頁面資訊等應用程式層級的資訊。redux 隨然能夠解決上述的 props drilling 和 re-render 問題,但是把某一個頁面的某一個 component 的 "局部狀態" 放於 "全局" 來管理似乎不太合適,再加上公司的 redux 因為一些歷史因素,開發上不是很方便使用,因此我決定尋找 Redux 與 useContext 以外的解決方案。
剛好最近老闆在開會的時候不停的安利 Zustand,花了一些時間研究後,發現 Zustand 非常易學,且對開發者也十分友善,可以用更簡短易懂的寫法 cover 掉大部分 redux 能做到的事情,且官方文件恰好有針對我目前的需求提供一個很好的解決方案,因此在這個專案中我選擇使用這個我之前從未使用過的工具。
各 state management tools 概覽
useContext
Redux
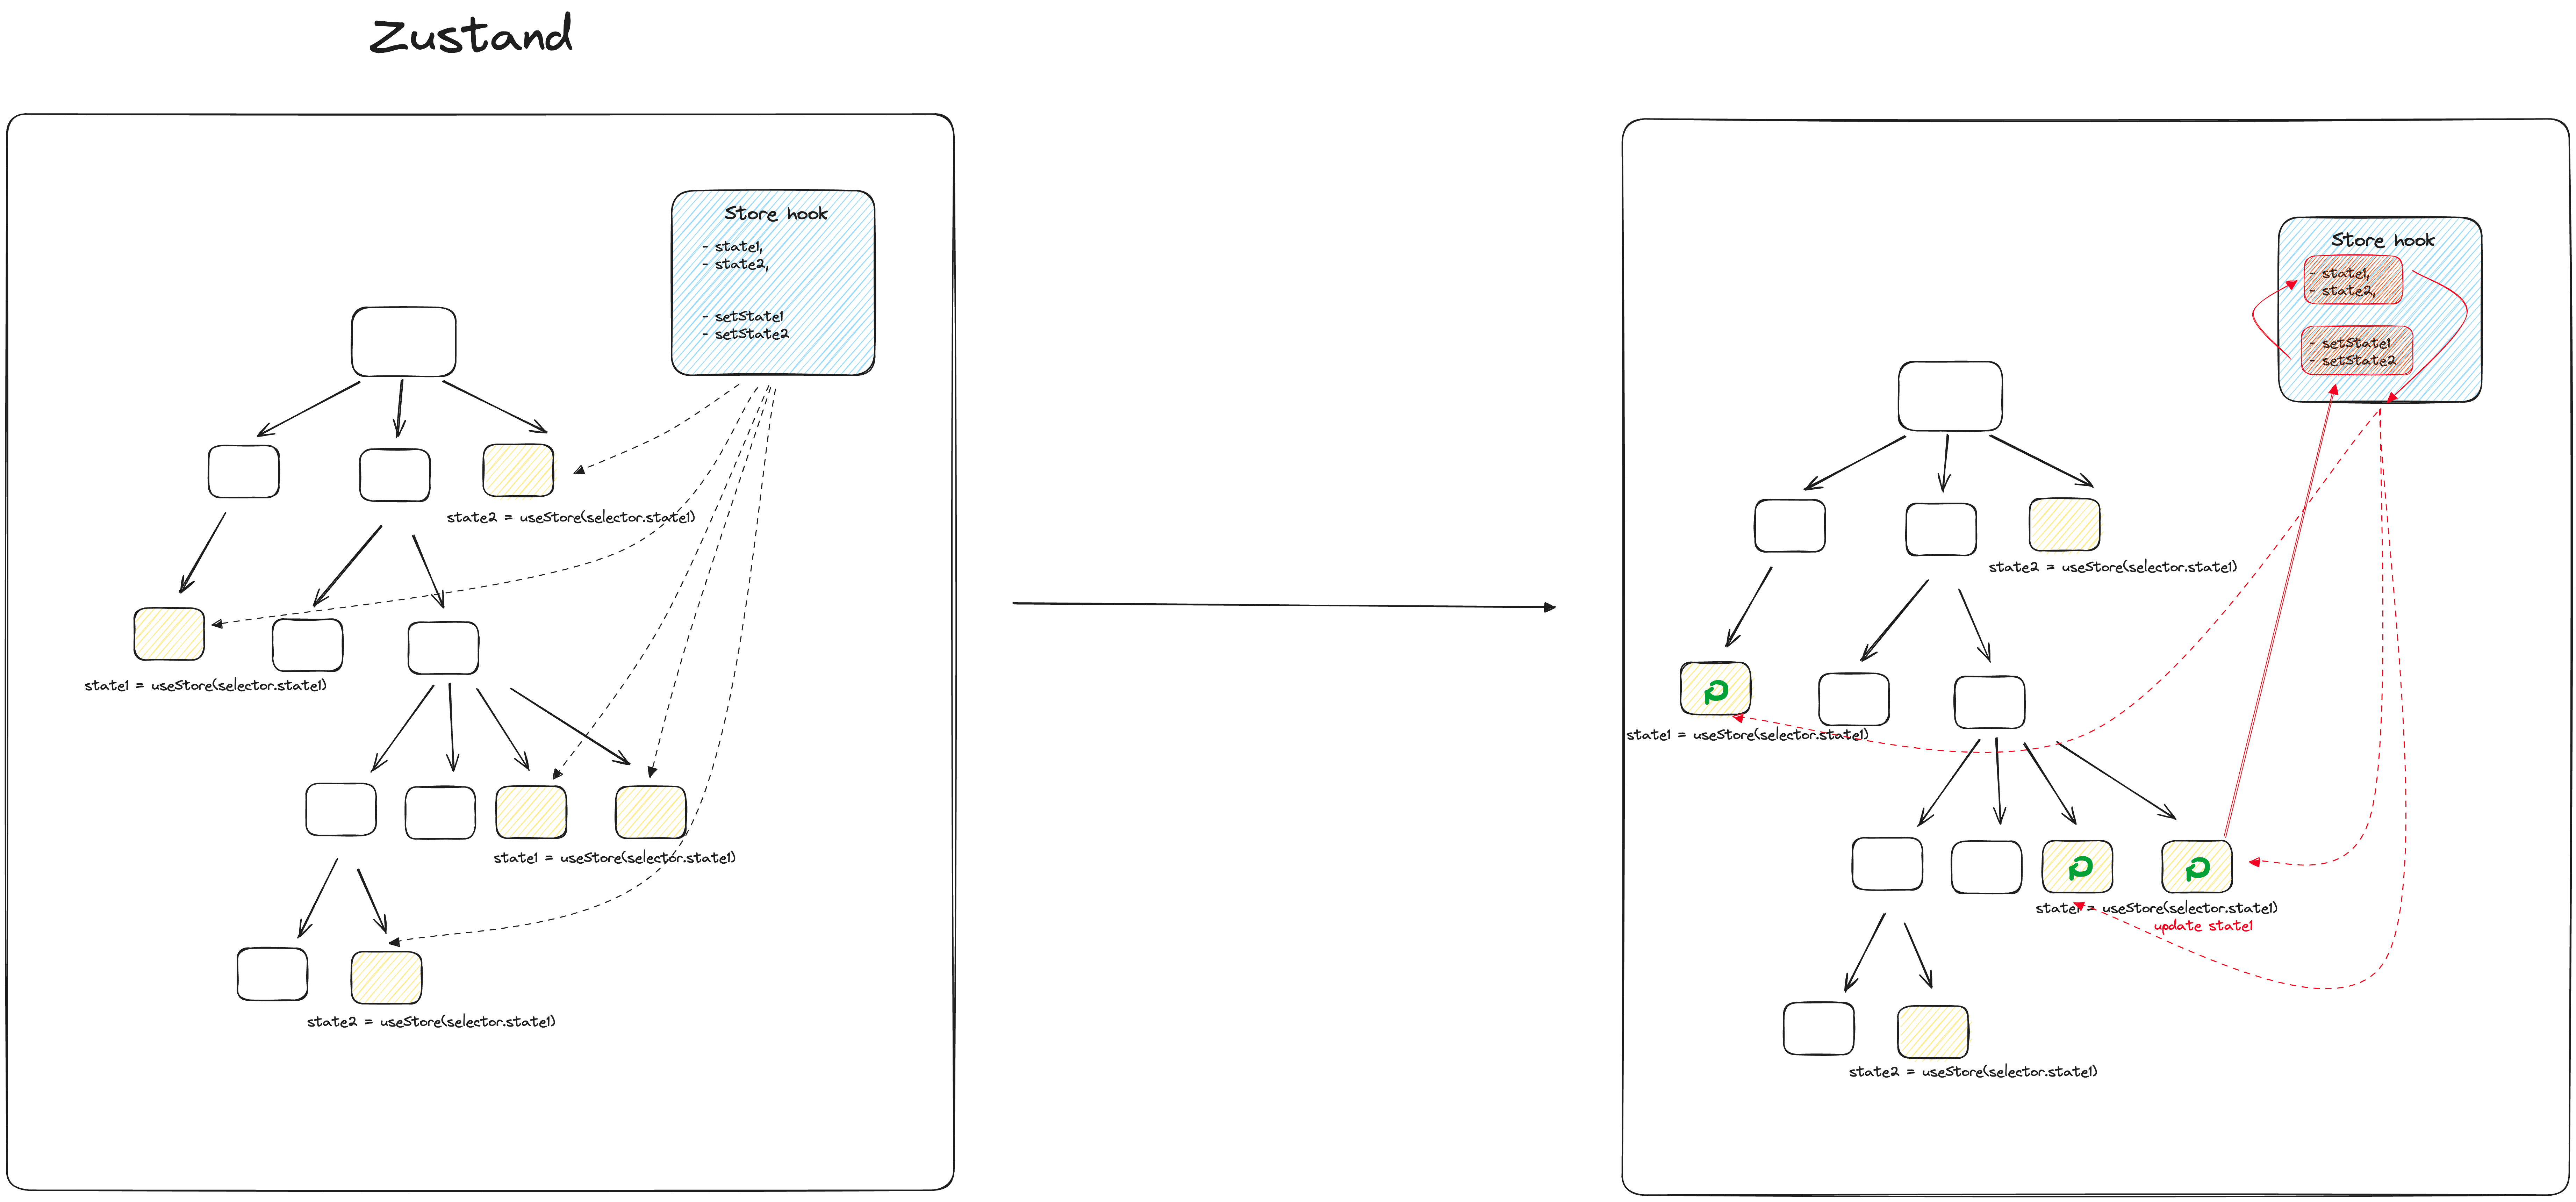
Zustand
Zustand 的優勢
- Zustand vs useContext
- 使用簡便性:Zustand 和 useContext 都相對簡單,但 Zustand 提供更多的功能和靈活性。
- 性能優化:Zustand 在管理大型和複雜狀態時表現更佳,且只會在 state 變更時才重新渲染 component
- Zustand vs Redux
- 簡潔性:Zustand 提供了更簡潔的 API,避免了 Redux 的繁瑣模板代碼。
- 設計理念:Redux 傾向於更嚴謹的架構,而 Zustand 更注重簡化和直接性。
- 學習曲線:Zustand 的學習曲線通常比 Redux 低。
- 性能:Zustand 在某些情況下可能提供更好的性能,尤其是在避免不必要的重新渲染方面。
- 擴展性和中間件:Redux 提供豐富的中間件生態系統,Zustand 則在保持輕量的同時也提供擴展性。
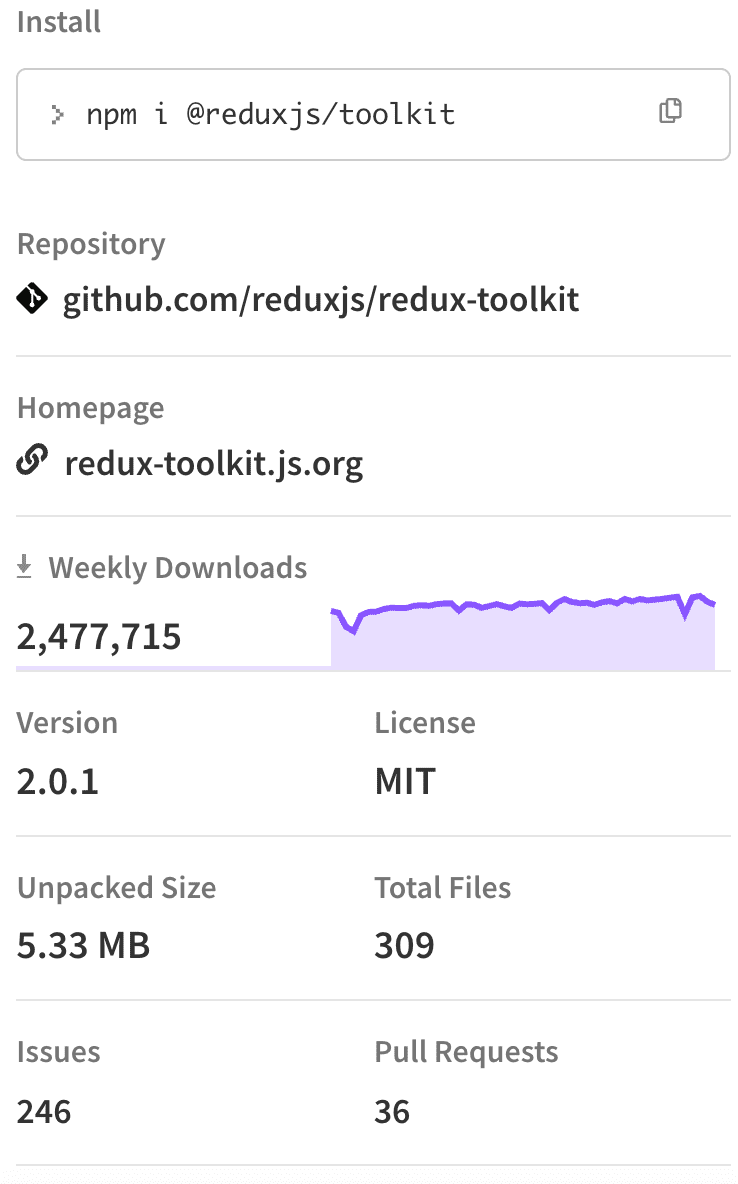
- 套件大小: Zustand 體積更小更輕便
Zustand 簡介
Zustand 是一款為 React 而生的狀態管理工具,以其簡潔明了的 API 和高效的性能表現,打破了傳統狀態管理工具的束縛。它不僅輕量級、不依賴於繁瑣的模板代碼,還能夠以極低的學習成本為開發者提供強大的狀態管理能力。
Zustand 的特色
- 簡單直觀的 API:Zustand 摒棄了 Redux 那種基於 reducer, action 和 middleware 的複雜設計,提供了一個更為直接和簡潔的狀態管理方式。
- 基於 Hook 的設計:Zustand 完美融合 React 的 Hook API,讓狀態管理與組件之間的聯系更加緊密,使用上更加簡易自然。
- 無需 Context Provider:Zustand 允許我們在應用的任何地方直接使用 hook 訪問狀態,無需額外包裹 Context Provider。
- 效能優化:Zustand 通過有效的狀態選擇和更新,極大地減少了不必要的組件重渲染,從而提升了整體的應用性能。
- 異步操作支持:它無縫地支持異步操作,讓處理異步狀態更新變得輕而易舉。
- 易於擴展和集成:Zustand 提供了豐富的中間件支持,如日誌記錄、數據持久化等,讓你的狀態管理更加靈活和強大。
Zustand 使用方法範例
// src/store.js
import { create } from 'zustand'

// 建立 store hook
const useBearStore = create((set) => ({
	// states and actions
  bears: 0,
  increasePopulation: () => set((state) => ({ bears: state.bears + 1 })),
  removeAllBears: () => set({ bears: 0 }),
}))
// src/component/Counter.js
function BearCounter() {
	// use selector to get state value
  const bears = useBearStore((state) => state.bears)
  return <h1>{bears} around here ...</h1>
}

function Controls() {
	// use selector to get action function
  const increasePopulation = useBearStore((state) => state.increasePopulation)
  return <button onClick={increasePopulation}>one up</button>
}
Zustand 使用小技巧
使用 component 內的資料來初始化 zustand store hook
參考 Initialize state with props (@Zustand) 後以
create直接建立 store hook,取代教學中用createStore建立 store 物件再配合 useStore hook 的使用方式
在 React 專案中,資料通常是透過 props �在 component 之間由上到下傳遞,在某些情況下,如果我們希望 zustand 可以幫我們集中管理特定 component 的資料狀態,這意味著以已經存在於特定 component 的資料來初始化 store ,那我們便不能以一般的使用方法,在任意一個獨立的檔案中 create store hook,再引入需要的 component 中,而是必須在 component 中接收上級 component 傳入的 props 作為初始值來 create store hook。
但問題來了,如果我們在 component 中 create store hook,那是否意味著我們只能透過 props 傳遞 store hook 給該 component 的 children 使用呢?這樣是否依然沒辦法解決 props drilling 的問題呢?
因此在這個情境下,若要解決 props drilling 的問題,我們需要用到 React 的 Context API 與 useContext 來傳遞 zustand 的 store hook。
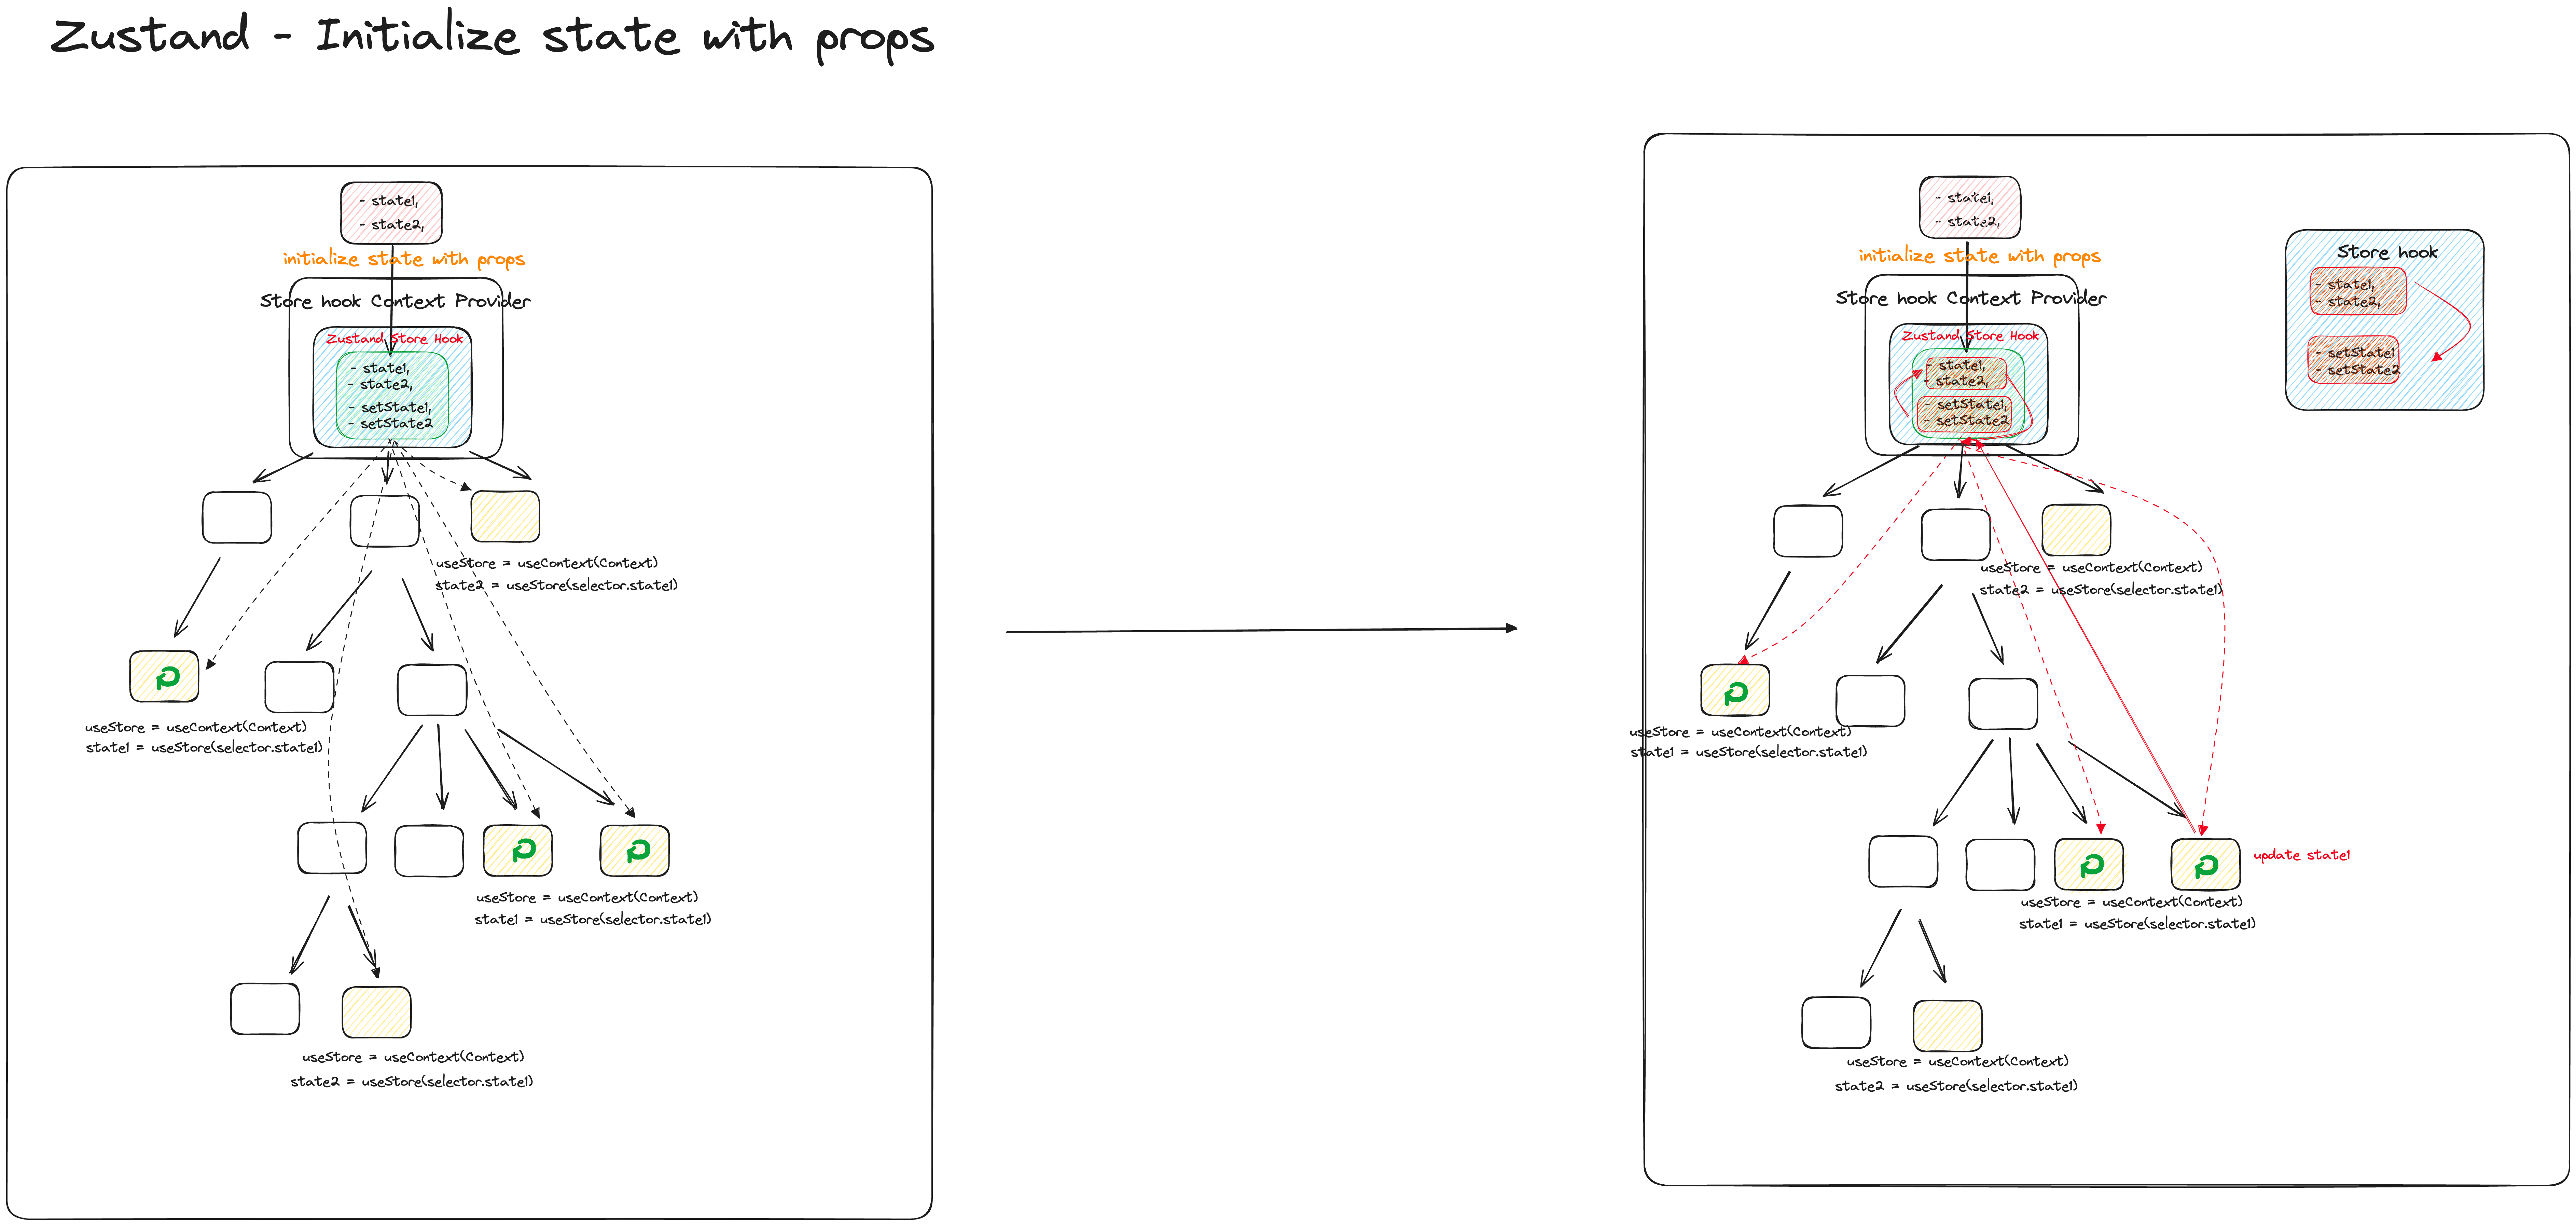
以下提供一個實作範例
-
建立一個
createStoreHookfunction,以預計會從上層 component 取得用以初始化 state 的 initProps 做為參數, 並回傳 store hook。// src/store.js
import { create } from 'zustand'
import { immer } from 'zustand/middleware/immer'
function createStoreHook(initProps) {
// 這邊把 initProps 解構是為了更方便閱讀,也可以不解構直接塞到 create 裡
const { state1, state2 } = initProps
const defaultProps = {
state1: -1,
state2: -1,
state3: { key1: 1, key2: 2, key3: { key3_1: 3 } },
}
return create(
// 用 immer middleware 更新 nested object
immer((set, get) => ({
...defaultProps,
state1,
state2,
setState1: () => set(() => ({ state1: get().state1 + 1 })),
setState2: () => set(() => ({ state2: get().state2 + 1 })),
setState3: () =>
set((state) => {
state.state3.key3.key3_1 += 1
}),
})),
)
} -
透過 createContext 建立 store hook 的 Context。
// src/StoreProvider.jsx
import { createContext } from 'react'
import { useRef } from 'react'

export const StoreContext = createContext(null)

export function StoreProvider({ children, ...props }) {
  const storeRef = useRef()
  storeRef.current = createStoreHook(props)

  return <StoreContext.Provider value={storeRef.current}>{children}</StoreContext.Provider>
每次
StoreProvider接收的 props 改變時,會觸發StoreProvider重新渲染,storeRef.current都被myStore(props)透過新的 props 重置成新的 store hook。也就是說,當傳入的 props 更新時,全局狀態會被重置。這麼設計的目的是讓 store hook 保持與 props 的資料狀態一致。- 應用範例:假設頁面中有一顆按鈕,點擊後可以開啟一個複雜的編輯視窗,由於該視窗的功能複雜,需要一個全局狀態管理工具來管理視窗內的編輯內容來解決 props drilling 等問題。我們希望該全局狀態一開始被初始化成資料庫內保存的資料內容,且在編輯過程中全透過全局狀態管理編輯欄位的資料。此外若沒有點擊儲存更新資料庫的資料內容便關閉編輯視窗,那麼再次打開該視窗時,編輯欄位不會保留之前編輯的狀態。
-
在 StoreProvider 內的所有 children components 都可以用 useContext 取得初始 state 為特定資料的 store hook。
// src/App.js

function Counter1() {
  const useStore = useContext(StoreContext)
  const state1 = useStore((store) => store.state1)
  const setState1 = useStore((store) => store.setState1)

  return (
    <div className="counter">
      <span>{state1}</span>
      <button onClick={setState1}>one up</button>
    </div>
  )
}

function Counter2() {
  const useStore = useContext(StoreContext)
  // 使用 useShallow 一次取多個 state
  const { state2, setState2, state3, setState3 } = useStore(
    useShallow((store) => ({ state2: store.state2, setState2: store.setState2, state3: store.state3, setState3: store.setState3 })),
  )

  return (
    <>
      <div className="counter">
        <span>{state2}</span>
        <button onClick={setState2}>one up</button>
      </div>
      <div className="counter">
        <span>{state3.key3.key3_1}</span>
        <button onClick={setState3}>nested object++</button>
      </div>
    </>
  )
}

export default function App() {
  const [state1, setState1] = useState(1)
  const [state2, setState2] = useState(2)
  return (
    <>
      <Scene />
      <div className="main">
        <div className="code">
          <div className="code-container">
            <StoreProvider state1={state1} state2={state2}>
              <Counter1 />
              <Counter2 />
            </StoreProvider>
          </div>
          <div className="code-container">
            <div className="counter">
							{/* 觀察更新 store hook 的 initProps */}
              <button
                onClick={() => {
                  setState2(state2 + 1)
                }}>
                change initProps
              </button>
            </div>
          </div>
        </div>
        <Details />
      </div>
    </>
  )
}
用 useShallow 取得 state ,避免預料外的 re-render
在 Zustand 中,store 就是一個 hook:
Your store is a hook! You can put anything in it: primitives, objects, functions. State has to be updated immutably and the
setfunction merges state to help it. - @Zustand Github
我們可以透過內建的 create 函式建立 hook ,持儲存任何想要在全局狀態內管理的變數(state)、函式(action)。
import { create } from 'zustand'

const useBearStore = create((set) => ({
  bears: 0,
  increasePopulation: () => set((state) => ({ bears: state.bears + 1 })),
  removeAllBears: () => set({ bears: 0 }),
}))
Zustand 的 hook 使用方法十分具有彈性,可以直接透過解構式取值,也可以透過 selector 函式取值。官方建議我們盡量用 selector 的寫法來取得需要的 state,以避免不必要的 re-render。然而即便是使用了 slelector 的取值寫法,仍然有可能不小心在一些狀況下觸發到 re-render。
由於 Zustand 使用 Object.is 來判斷取得的 state 是否是新的(畫面是否需要 re-render),因此以不同的寫法取相同的 state 可能會有不同的 re-render 結果,以下列出不同種取值方法並且分析是否會造成 re-render。
-
使用 selector 取得一個或多個 state
-
一次只取一個 state :當其他 state 更新時不會觸發 re-render
function BearCounter() {
  const bears = useBearStore((state) => state.bears)
  return <h1>{bears} around here ...</h1>
} -
一次取多個 state:由於 zustand 中的集中管理所有 state 的 store 是 Immutable object ,因此每次取多個 state 組成的 object 都會是新的,當其他 state 更新時
會觸發 re-renderconst { nuts, honey } = useBearStore(
(state) => ({ nuts: state.nuts, honey: state.honey }),
)
-
-
不使用 selector 取得一個或多個 state
這種取值方法相當於一次跟 useBearStore 取了所有的 state,在解構出特定的 state,因此當其他 state 更新時
會觸發 re-renderconst { bear } = useBearStore()
const { nuts, honey } = useBearStore()
從上述例子可以得知,當我們想要一次取得多個 state 時,不論以哪種寫法都會造成 re-render。這個問題可以透過 zustand 內建的 useShallow 來解決:
const { nuts, honey } = useStore(
	useShallow((store) => (
		{ state2: store.nuts, setState2: store.honey }
	))
)
更新 Nested Object
參閱 Immutable state and merging, Updating state, Immer middleware
- 更新整個 Nested Object
import { create } from 'zustand'

const useStore = create((set) => ({
  nested: { key1: 0, key2: 0 },
  updateNested: (newNested) =>
    set({
      nested: newNested,
    }),
}))
- 👎更新 Nested Object 中的其中一個屬性(explicitly)
當 nested object 很複雜時,用 … 複製每個的object level 會變得很冗長
import { create } from 'zustand'

const useStore = create((set) => ({
  nested: { key1: 0, key2: 0 },
  nestedKey1Add: () =>
    set((state) => {
        nest: {...nested, key1: state.nested.key1 + 1}
    }),
  newNestedKey1Value: (newKey1Value) =>
    set({
      nest: {...nested, key1: newKey1Value}
    })
}))
- 👍更新 Nested Object 中的其中一個屬性(by immer middleware)
直接更新 nested object 的其中一個屬性,不需複製整個 nested object
import { create } from 'zustand'

const useStore = create(
	immer((set) => ({
	  nested: { key1: 0, key2: 0 },
	  nestedKey1Add: () =>
	    set((state) => {
				state.nested.key1 += 1
			}),
		newNestedKey1Value: (newKey1Value) =>
			set((state) => {
				state.nested.key1 = newKey1Value
			})
	}))
)
在 Store Hook 外部定義 action
Zustand 官方文件建議我們將所用來更新 state 的 function (actions) 集中寫在 store 裡,但 zustand 也允喜我們在外部定義 actions, 這麼做有幾個好處:
- 增加 action 的靈活性: 有些 actions 會隨著產品需求與一開始定義的不一樣,將 action 定義在直接使用到的 component 可以避免為了特定 component 改變 action 功能而影響到其他使用該 action 的 component
- 保持全局 store 易讀性: 某些 action 可能只在特定的 component 上作用,當這類型的 actions 很多的時候,若將全部 action 集中寫在 store hook 裡面,可能會讓 store hook 很龐大。假設 store 中存著一個複雜的 nested object,若要為每個屬性的更新動作都建立 actions function,將會令 create store hook 的程式碼十分冗長。
function Counter2() {
  const useStore = useContext(StoreContext)
  const { state2, setState2,} = useStore(
    useShallow((store) => ({ state2: store.state2, setState2: store.setState2 })),
  )
	// 必須在 create hook 時使用 immer middleware 才可以像這樣直接更新 nested object 的內容
  const updateState3 = () => {
    useStore.setState((state) => {
      state.state3.key3.key3_1 += 1
    })
  }
}