

For a long time, it was hard to talk about JavaScript frontend development without mentioning Webpack. Released in 2012, it spent the next decade as the dominant frontend bundler. Then, in 2020, a new tool called Vite began gaining ground fast. According to the 2023 State of JavaScript survey, Vite became the second most widely used build tool in just three years. On interest and positivity, it was already in first place.
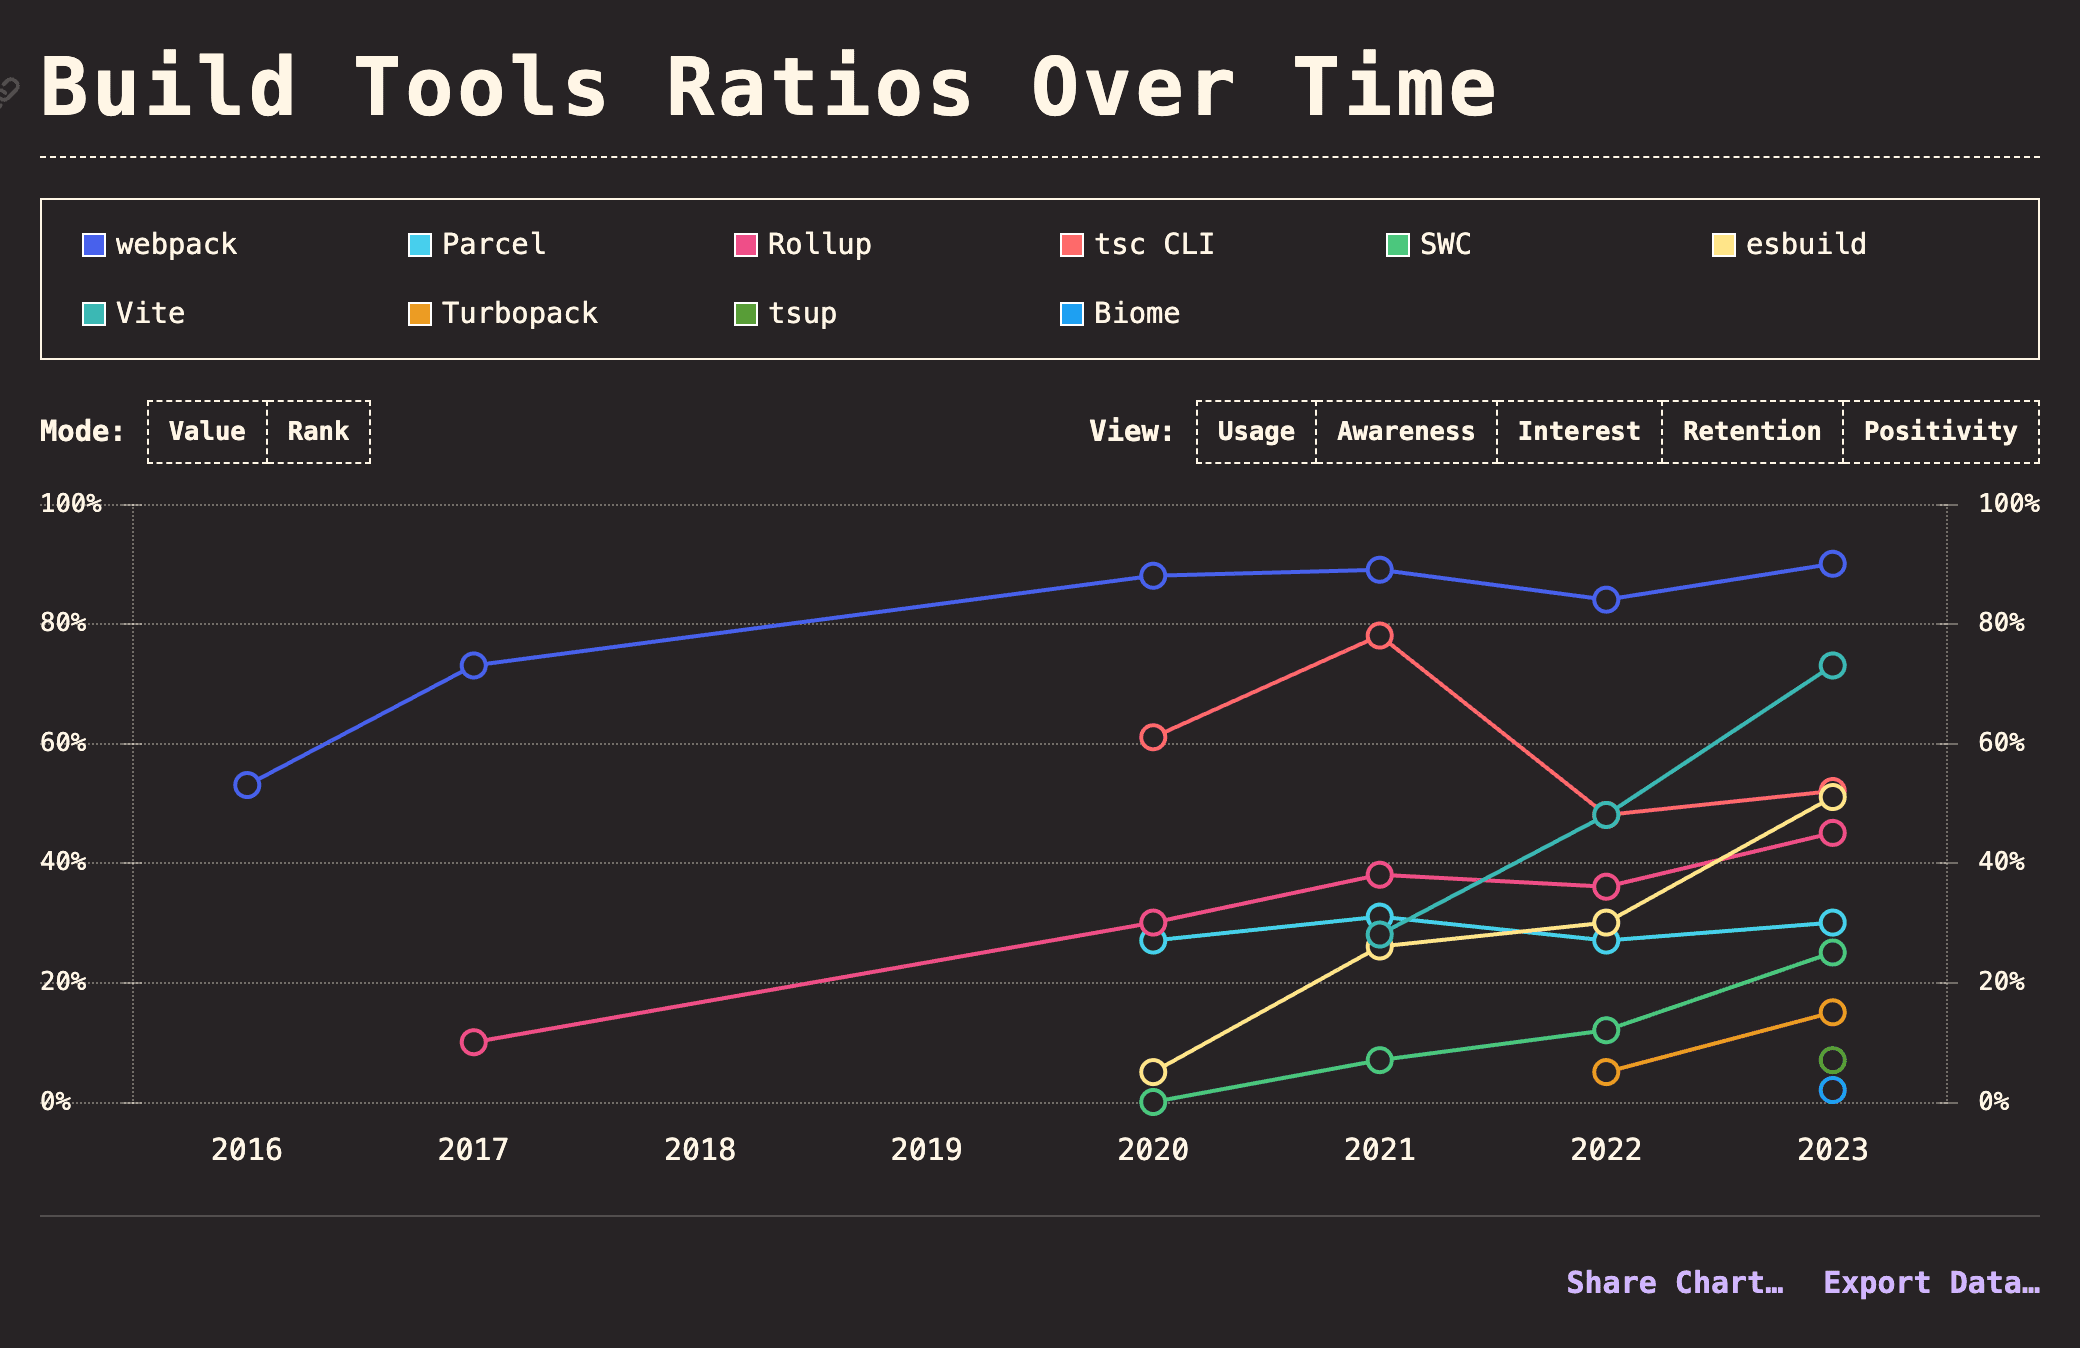
If you follow the JavaScript frontend ecosystem, you've probably felt how quickly Vite's popularity has grown over the past couple of years. For a while, it almost felt like everyone was saying “Webpack is dead.” We use Webpack at my company, while I tend to choose Vite for my own practice projects, so I can see the difference in ease of use and why more frontend developers are drawn to Vite. But beyond the familiar advantages, such as working out of the box and fast HMR, I wanted to understand the deeper technical differences. This post collects what I've learned about how each tool delivers the features we expect from a modern bundler, where each fits, and what its limitations might be.
This post draws on Vite vs. Webpack: A Head-to-Head Comparison and the official Vite website.
What Is a Bundler?
Before getting into everything Vite and Webpack can do, let's look at the role they play in a web application: the bundler.
What a Bundler Does
A JavaScript module bundler combines multiple JavaScript files into one or a small number of files, called bundles. Combining files reduces the number of requests a web application needs, helping it load faster and perform better.
An Example
Suppose we have two separate JavaScript files, module1.js and module2.js:
// module1.js
export const greet = (name) => {
    console.log(`Hello, ${name}!`);
}

// module2.js
export const farewell = (name) => {
    console.log(`Goodbye, ${name}!`);
}
A JavaScript bundler such as Rollup, Webpack, or Parcel can combine these modules with an index.js file:
// index.js
import { greet } from './module1.js';
import { farewell } from './module2.js';

greet('Kinsta');
farewell('Server Troubles');
The bundler combines module1.js, module2.js, and index.js into an optimized bundle for the web application to use.
Benefits
- Fewer HTTP requests: Combining files reduces the number of requests.
- Code optimization: Minification and obfuscation reduce file size.
- Browser compatibility: Browser-specific issues can be handled to provide a consistent experience.
- Code transformation: Transformations such as transpilation help the code run in all target environments.
Modern browsers support ES modules and HTTP/2, which help address request overhead. JavaScript bundlers still have a role, though, because they perform essential code transformations and optimizations.
A Quick Introduction to Vite and Webpack
Vite: A Modern Tool Built Around the Development Experience
Vite is a modern frontend build tool designed for fast development and efficient builds. It uses native ES modules and Rollup underneath, providing fast Hot Module Replacement (HMR) during development and efficient bundling for production.
Vite's main features
- Fast cold starts: Native ES module support lets Vite start only what's needed, avoiding the wait to bundle the whole application.
- Fast HMR: Changes show up quickly in the browser, shortening the feedback loop.
- Modern syntax support: Built-in support for TypeScript, JSX, and CSS preprocessors such as Sass and Less.
- Lightweight configuration: Setup is more straightforward than with traditional bundlers, making it easier to learn.
- Extensibility: Plugins can extend Vite to meet a project's needs.
Webpack: A General-Purpose Module Bundler
Webpack is a powerful module bundler that was the default choice for frontend development for years. It handles many resource types, including JavaScript, CSS, and images, and offers extensive configuration options and a plugin system.
Webpack's main features
- Flexibility and extensibility: Its configuration and plugins cover a wide range of complex applications.
- Module management: It supports formats such as CommonJS, AMD, and ES modules to manage dependencies.
- Community support: A large user base and a broad collection of third-party plugins.
- A comprehensive feature set: Support from development through production, including HMR, minification, code splitting, lazy loading, and obfuscation.
Architecture and Design Philosophy
Vite's Design Philosophy
Vite centers on a lightweight, extensible core, with an emphasis on simplicity and long-term maintainability. Its architecture separates development from production builds, using modern browsers' native ES module support and fast HMR to improve the development experience.
-
Development: Vite uses native ES modules to start only the necessary parts of an application, reducing cold-start time. When code changes, it recompiles only the affected parts and sends updates to the browser through HMR.
-
Production builds: Vite uses Rollup for production bundling. Rollup generates efficient output and has a rich plugin system for optimizations such as code splitting, minification, and obfuscation.
-
Plugins: Vite's plugin system builds on Rollup and is easy to extend. We can add or write plugins for specific needs without bloating the core. Vite works closely with the Rollup project to maintain compatibility and share its plugin ecosystem.
-
The philosophy in practice: Vite's support for modern JavaScript features, such as ES modules and Worker syntax, illustrates this approach:
// app.jsimport { greet } from './utilities.js';const worker = new Worker(new URL('./worker.js', import.meta.url));worker.postMessage({ input: 42 });worker.onmessage = (e) => {const result = e.data.result;console.log(`Result from the web worker: ${result}`);};const message = greet('Hello, Vite!');console.log(message);Here, we import
greetfrom utilities.js using ES module syntax and create a Web Worker withnew URL('./worker.js', import.meta.url). Vite supports both directly, without extra configuration. That simplifies setup and leaves us more time to work on features.
Webpack's Design Philosophy
Webpack puts modules at the center of its design. Its configuration and plugin systems provide flexible control over bundling and resource management. It's designed as a full-featured module bundler that can handle a wide range of complex applications.
-
Module management: Webpack supports ES2015
import, CommonJSrequire, AMDdefineandrequire, and@importin CSS, Sass, and Less. Loaders transform resources into modules JavaScript can reference. This makes building a project feel a bit like assembling Lego bricks, with benefits for readability and maintenance. -
Flexible configuration: We can define the build process in detail, including entry points, output files, and module resolution rules.
-
Plugins: Plugins can extend or customize almost every part of the bundling process, giving Webpack the flexibility to handle many different requirements.
-
Code optimization: Code splitting, tree shaking, minification, and obfuscation help produce efficient production output.
-
The philosophy in practice: This modular approach works particularly well for large projects. Configuration and loaders help organize a project into readable, maintainable modules. For example:
// webpack.config.jsconst path = require('path');module.exports = {entry: './app.js',output: {filename: 'bundle.js',path: path.resolve(__dirname, 'dist'),},module: {rules: [{test: /\.js$/,use: 'babel-loader',exclude: /node_modules/,},],},};This example configures the build process and uses Babel Loader to handle code transformation. It shows how Webpack's resource handling and optimization can support clean, modular code and a better user experience.
What Vite and Webpack Have in Common
Despite their different design choices, they share a few principles:
- Modularity: Both encourage splitting an application into small, reusable modules to make it easier to maintain and extend.
- A plugin-driven architecture: Both let us extend functionality without changing the core. Plugins give us considerable freedom to customize the build process.
Configuration and Ease of Use
Vite's Minimal Configuration
One of Vite's goals is to make configuration straightforward so we can get started quickly and focus on development. Most projects need little or no configuration, which is a large part of its out-of-the-box appeal.
-
Useful defaults: Vite's defaults cover common development needs, so getting a project running doesn't require extensive setup.
-
A simple configuration file: For custom settings, create
vite.config.jsin the project root. Its structure is straightforward. In the example below, we only import and register Vite's official Vue.js plugin. Vite automatically detects the right settings for most projects, reducing the setup work.// vite.config.jsimport { defineConfig } from 'vite';import vue from '@vitejs/plugin-vue';export default defineConfig({plugins: [vue()],}); -
Plugins: The Rollup-based plugin system makes configuration and extensions simple. Install and register the appropriate plugin to add the functionality you need.
-
Development server settings: These also go in
vite.config.js, for example:export default defineConfig({server: {port: 3000,},});
Webpack's More Involved Configuration
Webpack's configuration is more complex and flexible because of its broad feature set and the range of applications it supports. Recent versions have moved toward zero configuration, but setup is still less automatic than with Vite. Webpack can cover many different requirements, at the cost of more detailed configuration.
-
Detailed configuration files: Configuration covers entry points, output, module resolution, plugins, and more. The following example sets up the build process, code optimization, and resource handling. Compared with Vite, it requires more manual setup: defining entry and output paths, selecting loaders for each file type, and adding plugins for specific features.
// webpack.config.jsconst webpack = require('webpack');const path = require('path');const { HotModuleReplacementPlugin } = require('webpack');const { VueLoaderPlugin } = require('vue-loader');module.exports = {entry: './src/main.js',output: {path: path.resolve(__dirname, './build'),filename: 'bundle.js',},module: {rules: [{test: /\.js$/,exclude: /(node_modules|bower_components)/,use: {loader: 'babel-loader',options: {presets: ['@babel/preset-env'],},},},{test: /\.vue$/,use: {loader: 'vue-loader',},},{test: /\.css$/,use: ['vue-style-loader', 'css-loader'],},],},resolve: {alias: {vue: 'vue/dist/vue.js',},},plugins: [new HotModuleReplacementPlugin(),new VueLoaderPlugin(),],}; -
A wide range of plugins and loaders: These cover many needs but also add complexity. We have to choose and configure the right ones for the project.
-
Extensive customization: We can customize every part of the build process, which requires a deeper understanding of the configuration to make full use of it.
-
Multiple configuration files: Large projects often have separate configurations for development, testing, and production, adding another layer of complexity.
Development Servers
Server Configuration
Both tools offer capable development servers. How we configure and use them differs, though, and that affects day-to-day productivity.
-
Vite's server configuration: The development server is built in and ready to use, usually with no extra setup. A few settings in
vite.config.jsare enough for customization:// vite.config.jsimport { defineConfig } from 'vite';import vue from '@vitejs/plugin-vue';export default defineConfig({plugins: [vue()],server: {port: 3000,open: true, // Open the browser automatically when the server startsproxy: {'/api': 'http://localhost:5000',},},}); -
Webpack's server configuration: Options such as
webpack-dev-serverandwebpack-dev-middlewareneed additional setup to compile code automatically and respond to changes. Configuration is more involved:// webpack.config.jsconst webpack = require('webpack');const path = require('path');const { HotModuleReplacementPlugin } = require('webpack');const { VueLoaderPlugin } = require('vue-loader');module.exports = {entry: './src/main.js',output: {path: path.resolve(__dirname, './build'),filename: 'bundle.js',},module: {rules: [{test: /\.js$/,exclude: /(node_modules|bower_components)/,use: {loader: 'babel-loader',options: {presets: ['@babel/preset-env'],},},},{test: /\.vue$/,use: {loader: 'vue-loader',},},{test: /\.css$/,use: ['vue-style-loader', 'css-loader'],},],},resolve: {alias: {vue: 'vue/dist/vue.js',},},plugins: [new HotModuleReplacementPlugin(),new VueLoaderPlugin(),],devServer: {contentBase: path.join(__dirname, 'public'),port: 3000,hot: true,open: true,proxy: {'/api': 'http://localhost:5000',},},};
Cold-Start Speed
-
Vite's cold starts:
Vite pre-bundles dependencies with esbuild, a high-performance bundler written in Go, to reduce initialization time. Native ES modules let it transform and serve source code only when the browser requests it, speeding up server startup.
- Efficient dependency handling: Pre-bundling can combine the 600-plus internal modules in
lodash-esinto one module, reducing HTTP requests and improving development server performance. - On-demand loading: Native ES modules let Vite load source code as needed, minimizing server load and latency.
- Efficient dependency handling: Pre-bundling can combine the 600-plus internal modules in
-
Webpack's cold starts:
Webpack tends to bundle source code and dependencies before serving them. That makes initial startup longer during development, usually taking more time than Vite.
- The bundled approach: Having all the site's data ready makes navigation between pages faster on the development server, but takes longer to initialize.
HMR (Hot Module Replacement)
- Vite's HMR: Native ESM shifts some of the work from the server to the browser, reducing server load and latency. Updates arrive quickly without reloading the entire page, giving us fast feedback while developing.
- Webpack's HMR: Webpack also supports live updates while preserving application state. Unlike Vite, it requires the relevant plugins and settings to be enabled in its configuration.
Caching Performance
1. Vite's caching:
- Browser caching: Modules are served over HTTP using the browser's native ES module support. The browser caches them, avoiding repeated loads and improving responsiveness during development.
- Pre-bundled dependency cache: Vite pre-bundles and caches third-party dependencies, such as npm packages, on the first run. Later starts reuse the local cache rather than parsing and bundling them again.
- HMR caching: During development, HMR updates only the modules that changed instead of reloading the whole application. This fine-grained approach speeds up iteration.
2. Webpack's caching:
- Persistent caching: Compiled modules and assets can be cached on disk and reused in later builds, substantially reducing compilation time.
- Module caching: During development, Webpack reuses compiled modules that haven't changed instead of recompiling them.
- DLL Plugin: Third-party libraries that rarely change can be bundled and cached in advance, then reused during development and builds to avoid repeated compilation.
- Output caching: Content hashes in filenames support browser caching. If a file's contents don't change, neither does its filename, so the browser can reuse its cached copy.
Optimizing the Build Process
Generating Preload Directives
Preload directives tell the browser which resources to load first, speeding up the initial render.
-
Vite's preload directives:
Vite automatically generates
<link rel="modulepreload">directives for entry chunks and their direct imports in the built HTML to speed up loading. For example:<!-- Vite - Module Preloading --><link rel="modulepreload" href="/module-a.js"> -
Webpack's preload directives:
Webpack didn't originally support resource hints natively. Starting with v4.6.0, it added support for prefetching and preloading. Inline directives in module imports let it emit resource hints that tell the browser when to load those modules:
import(/* webpackPreload: true */ '/module-a.js');This produces:
<!-- Webpack - Manual Module Preloading --><link rel="preload" as="script" href="/module-a.js">
CSS Code Splitting
CSS code splitting breaks CSS into separate files that can load on demand, improving page-load performance.
-
CSS code splitting in Vite:
Vite automatically extracts CSS from async chunks into separate files. When an async chunk loads, only its required CSS is fetched through
<link>tags. Vite also waits for that CSS to load before processing the async chunk, avoiding a flash of unstyled content (FOUC).Since this is configured for us, we can import CSS as usual. Vite handles splitting and loading without extra setup:
import './main.css'; -
CSS code splitting in Webpack:
Webpack offers more flexibility but requires more configuration. Plugins such as
mini-css-extract-plugincan extract and split CSS:// webpack.config.jsconst MiniCssExtractPlugin = require('mini-css-extract-plugin');module.exports = {// ...other configurationmodule: {rules: [{test: /\.css$/,use: [MiniCssExtractPlugin.loader, 'css-loader'],},],},plugins: [new MiniCssExtractPlugin({filename: '[name].css',chunkFilename: '[id].css',}),],};
Code Splitting and Chunk Loading
Code splitting divides code into smaller, manageable chunks that load when needed. This reduces initial load time, saves resources, and improves application performance.
-
Code splitting in Vite:
Vite uses Rollup to split code automatically when there are dynamic imports or multiple entry points. This reduces initial loading work and improves performance and the user experience.
Automatic code splitting
Vite analyzes module dependencies and divides the application into chunks. They load on demand at runtime, avoiding the cost of loading the whole application at once.
Manual chunk configuration
Rollup's
output.manualChunksoption lets us specify which modules belong in separate chunks. For example, we can put third-party libraries in a vendor chunk:// vite.config.jsexport default defineConfig({build: {rollupOptions: {output: {manualChunks: {vendor: ['vue', 'vue-router'],},},},},});Dynamic imports
Vite supports dynamic imports to load modules as needed at runtime, further reducing initial load time and improving responsiveness. A variable can specify which module to load:
const module = await import(`./dir/${moduleName}.js`);Splitting out a vendor chunk
The official
splitVendorChunkPluginautomatically puts third-party libraries into a separate vendor chunk to optimize loading:import { splitVendorChunkPlugin } from 'vite';export default defineConfig({plugins: [splitVendorChunkPlugin()],}); -
Code splitting in Webpack:
Webpack offers several approaches: entry points, the SplitChunks plugin, and dynamic imports.
Entry points: Multiple entry points are a simple way to split code, but they have a limitation. If two entry chunks import the same module, that module ends up in both, duplicating code across chunks.
const path = require('path');module.exports = {mode: 'development',entry: {index: './src/index.js',another: './src/separate-module.js',},output: {filename: '[name].bundle.js',path: path.resolve(__dirname, 'dist'),},};Preventing duplication: The SplitChunks plugin or entry dependencies reduce duplication so shared modules only need to load once.
const path = require('path');module.exports = {mode: 'development',entry: {index: {import: './src/index.js',dependOn: 'shared',},another: {import: './src/another-module.js',dependOn: 'shared',},shared: 'lodash',},output: {filename: '[name].bundle.js',path: path.resolve(__dirname, 'dist'),},optimization: {runtimeChunk: 'single',},};Dynamic imports: Modules can load on demand. Webpack's magic comments let us set chunk names, enable lazy loading, and control fetch priority.
const { default: _ } = await import('lodash');import(/* webpackChunkName: "my-chunk-name" *//* webpackMode: "lazy" *//* webpackExports: ["default", "named"] *//* webpackFetchPriority: "high" */'module');
Tree Shaking
Tree shaking removes unused code to make bundles smaller and improve loading performance.
-
Tree shaking in Vite:
Vite uses Rollup, which is known for its tree-shaking capabilities. During bundling, Rollup analyzes module dependencies and references, removing unused code and keeping only what the application needs.
- ES modules: Vite and Rollup use the ES module standard, whose statically analyzable structure lets them identify and remove unused code accurately.
- No extra configuration: Tree shaking works out of the box; Rollup handles these optimizations automatically.
-
Tree shaking in Webpack:
Webpack supports tree shaking too, but some settings and conditions are needed to get the most from it.
-
ES modules: As with Vite, tree shaking relies on ES module syntax so unused code can be identified through static analysis.
-
Configuration requirements:
- Production mode: Webpack enables tree shaking in production mode. Set
mode: 'production'in the configuration. - sideEffects: Set
sideEffectsinpackage.jsonor the Webpack configuration to identify files without side effects that can safely be tree-shaken.
// package.json{"name": "your-project","sideEffects": false}Or in the configuration:
// webpack.config.jsmodule.exports = {mode: 'production',// Other configurationoptimization: {usedExports: true,},module: {rules: [// Other rules{test: /\.js$/,sideEffects: false,},],},}; - Production mode: Webpack enables tree shaking in production mode. Set
-
Handling Static Assets
Images, fonts, and other static files are essential to web development. Vite and Webpack handle them differently, with their own strengths and optimization options.
Static Assets in Vite
Vite keeps asset handling straightforward. Importing an asset during development returns its resolved public URL:
import kinstaImage from './kinsta-image.png';
During development, kinstaImage resolves to /img.png. In production, the URL becomes something like /assets/img.2d8efhg.png for better caching and performance.
-
The static asset directory:
Files placed in
publicare copied to the output directory during the build. Assets can be referenced through absolute public paths or relative paths. This handling also applies to URLs in CSS. -
Recognized asset types:
Vite recognizes common image, media, and font formats as assets. They become part of the build's asset graph and receive hashed filenames for optimization.
Static Assets in Webpack
Webpack offers flexible configuration through loaders and plugins to process and optimize static resources.
-
Importing assets:
As in Vite, assets can be imported directly:
import kinstaImage from './kinsta-image.png';Webpack adds the image to the output directory and provides its final URL.
-
Asset modules:
Webpack 5 introduced asset modules for handling different kinds of resources, beyond images. For example, we can configure font handling:
module.exports = {module: {rules: [{test: /\.(woff|woff2|eot|ttf|otf)$/,type: 'asset/resource',},],},};This lets us include font files through
@font-facedeclarations. -
CSS and HTML:
With
css-loaderandhtml-loader, Webpack resolves and replaces asset URLs in CSS and HTML automatically, keeping the paths correct in the output directory.
JSON Support
Both Vite and Webpack parse JSON files into JavaScript objects, making JSON data easy to use in a project. Both also support named imports from JSON, which helps with tree shaking.
// import an object
import json from './example.json'
// import a root field as named exports.
import { test } from './example.json'
TypeScript Support
TypeScript extends JavaScript with static types, making code easier to maintain and development more efficient. Both tools support it well.
TypeScript in Vite
Vite supports TypeScript out of the box without extra configuration. It uses esbuild as its default TypeScript compiler, making compilation fast. Its focus, however, is transpilation rather than type checking.
TypeScript in Webpack
Webpack requires configuration with ts-loader or babel-loader to compile and process TypeScript files. That means extra setup, but it also gives us flexibility and integration with other Webpack features.
-
Using ts-loader:
// webpack.config.jsconst path = require('path');module.exports = {entry: './src/index.ts',module: {rules: [{test: /\.ts$/,use: 'ts-loader',exclude: /node_modules/,},],},resolve: {extensions: ['.ts', '.js'],},output: {filename: 'bundle.js',path: path.resolve(__dirname, 'dist'),},}; -
Using babel-loader:
// webpack.config.jsconst path = require('path');module.exports = {entry: './src/index.ts',module: {rules: [{test: /\.ts$/,exclude: /node_modules/,use: {loader: 'babel-loader',options: {presets: ['@babel/preset-env','@babel/preset-typescript',],},},},],},resolve: {extensions: ['.ts', '.js'],},output: {filename: 'bundle.js',path: path.resolve(__dirname, 'dist'),},};
Glob Import Support
Glob imports use wildcard patterns to import multiple modules. Both Vite and Webpack support this, but through different mechanisms.
Glob Imports in Vite
Vite provides the built-in import.meta.glob method.
-
Using glob imports:
Import multiple modules with
import.meta.glob:const modules = import.meta.glob('./kinsta/*.js');// This produces the following structure:const modules = {'./kinsta/isCool.js': () => import('./kinsta/isCool.js'),'./kinsta/isAwesome.js': () => import('./kinsta/isAwesome.js'),'./kinsta/isFun.js': () => import('./kinsta/isFun.js'),};// Import modules dynamicallyfor (const path in modules) {modules[path]().then((module) => {console.log(path, module);});} -
The glob import
asoption:The
asoption lets us import files as strings:const modules = import.meta.glob('./kinsta/*.js', { as: 'raw', eager: true });// This is transformed into the following structure:const modules = {'./kinsta/rocks.js': 'export default "rocks"\n','./kinsta/rules.js': 'export default "rules"\n',};Vite also supports
{ as: 'url' }to load assets as URLs.
Glob Imports in Webpack
Webpack uses plugins such as webpack-import-glob-loader and glob-import-loader for glob imports.
-
Configuring a plugin:
Add a glob import plugin to the Webpack configuration:
// webpack.config.jsmodule.exports = {module: {rules: [{test: /\.js$/,loader: 'webpack-import-glob-loader',},],},}; -
Importing multiple modules:
With the plugin in place, wildcard patterns can import several modules:
// src/index.jsimport * as modules from './modules/**/*.js';console.log(modules);Given this
./modulesdirectory:modules/├── module1.js├── module2.js└── subfolder/└── module3.jsThe import brings
modules/module1.js,modules/module2.js, andmodules/subfolder/module3.jsinto themodulesobject.
Web Worker Support
Web Workers run JavaScript in background threads, avoiding blocking the main thread and improving performance and responsiveness. Both Vite and Webpack support them well.
Web Workers in Vite
Vite supports Web Workers out of the box. There are two ways to import a worker file.
-
Create a Web Worker:
Start with a file such as
worker.js:// worker.jsself.addEventListener('message', (e) => {const result = e.data * 2;self.postMessage(result);}); -
Use the Worker constructor:
Create a worker with
new Worker()ornew SharedWorker():// Using Workerconst worker = new Worker(new URL('./worker.js', import.meta.url));// Using SharedWorkerconst sharedWorker = new SharedWorker(new URL('./worker.js', import.meta.url)); -
Use the ?worker or ?sharedworker suffix:
Import the file directly with
?workeror?sharedworkerappended to its path:import MyWorker from './worker?worker';const worker = new MyWorker();worker.postMessage('Hello from the main thread!');
Web Workers in Webpack
Since version 5.0, Webpack has supported Web Workers natively, without a dedicated loader, making them easier to use in a Webpack project.
-
Create a Web Worker:
Start with a file such as
worker.js:// worker.jsself.addEventListener('message', (e) => {const result = e.data * 2;self.postMessage(result);}); -
Use the Worker constructor from the main thread:
Create the worker with
new Worker():const worker = new Worker(new URL('./worker.js', import.meta.url));worker.postMessage(10);worker.addEventListener('message', (e) => {console.log('Worker result:', e.data);});
Library Development
Both tools offer plenty of support for building libraries, though their design choices and features differ.
Building Libraries with Vite
Vite is designed for fast development and modern builds, with a dedicated library mode that makes library creation straightforward.
-
Fast TypeScript transpilation:
esbuildskips type checking and quickly transpiles TypeScript to JavaScript. -
External dependencies:
Dependencies such as Vue or React can be marked as external, so they're supplied by the consuming application rather than included in the library bundle. This keeps the library smaller.
-
Multiple module formats:
Vite supports ES modules natively and can produce formats such as ESM, CJS, and UMD for different use cases.
// vite.config.js
import { defineConfig } from 'vite';

export default defineConfig({
  build: {
    lib: {
      entry: 'src/main.js',
      name: 'MyLibrary',
      fileName: (format) => `my-library.${format}.js`,
    },
    rollupOptions: {
      external: ['vue'],
      output: {
        globals: {
          vue: 'Vue',
        },
      },
    },
  },
});
Building Libraries with Webpack
Webpack's flexibility also makes it suitable for building many kinds of JavaScript libraries. Its configuration lets us control how the library code is bundled.
// webpack.config.js
const path = require('path');

module.exports = {
  entry: './src/index.js',
  output: {
    path: path.resolve(__dirname, 'dist'),
    filename: 'my-library.js',
    library: 'MyLibrary',
    libraryTarget: 'umd',
    globalObject: 'this',
  },
  externals: {
    // Keep Vue external; do not bundle it into the library
    vue: {
      root: 'Vue',
      commonjs2: 'vue',
      commonjs: 'vue',
      amd: 'vue',
    },
  },
  module: {
    rules: [
      {
        test: /\.js$/,
        exclude: /node_modules/,
        use: {
          loader: 'babel-loader',
        },
      },
    ],
  },
};